Preface
What an absolute learning experience this has been!
Ever since my undergrad years, I’ve always wanted to build my own personal website. Back then, creating a simple Wix page was all I dared to do as dabbling with hosting felt overwhelming, and formal exposure to web infrastructure just wasn’t part of the curriculum (though I think it should be).
This website was born out of two motivations:
- To finally achieve a long-standing personal goal.
- To supplement my cloud infrastructure journey while pursuing my AWS SAA and Terraform certifications.
- To complete the Cloud Resume Challenge.
The Frontend
While the frontend wasn’t the main focus of this project, I first had to decide how to handle it. I love clean, attractive designs, but I didn’t want to be bogged down by the complexity of heavy frameworks like React or Angular (even though I’ve worked with them professionally).
Since this site would mostly be static, Hugo was the perfect fit. I had been messing around with Hugo a few years ago when I wanted to create a personal static website but abandoned the effort as life got intot he way. So now it seemed like the easiest and most practical choice to build off what I had stashed away.
Hugo treats pages as templates, which meant all I needed to focus on was:
- A single CSS file
- Multiple HTML files
.mdcontent files for posts and pages
The Meat and Potatoes: Getting Something Up
With the frontend chosen, it was time to figure out hosting. While studying for my AWS SAA certification, I learned that Amazon S3 can host static websites.
It was exactly what I needed.. simple, cost-effective, and easy to set up.
The process would be pretty straightforward:
- Create an S3 bucket.
- Enable static website hosting. (it’s disabled here - reason outlined further down blog)

- Upload my site files from the /public folder to the bucket.
Now, it wasn’t really that simple as I had to tweak some small bucket settings and permissions to get it to work, but because these were minor changes so I’ll spare the minute details. I referred to this handy tutorial available here: AWS S3 Static Website Hosting Guide
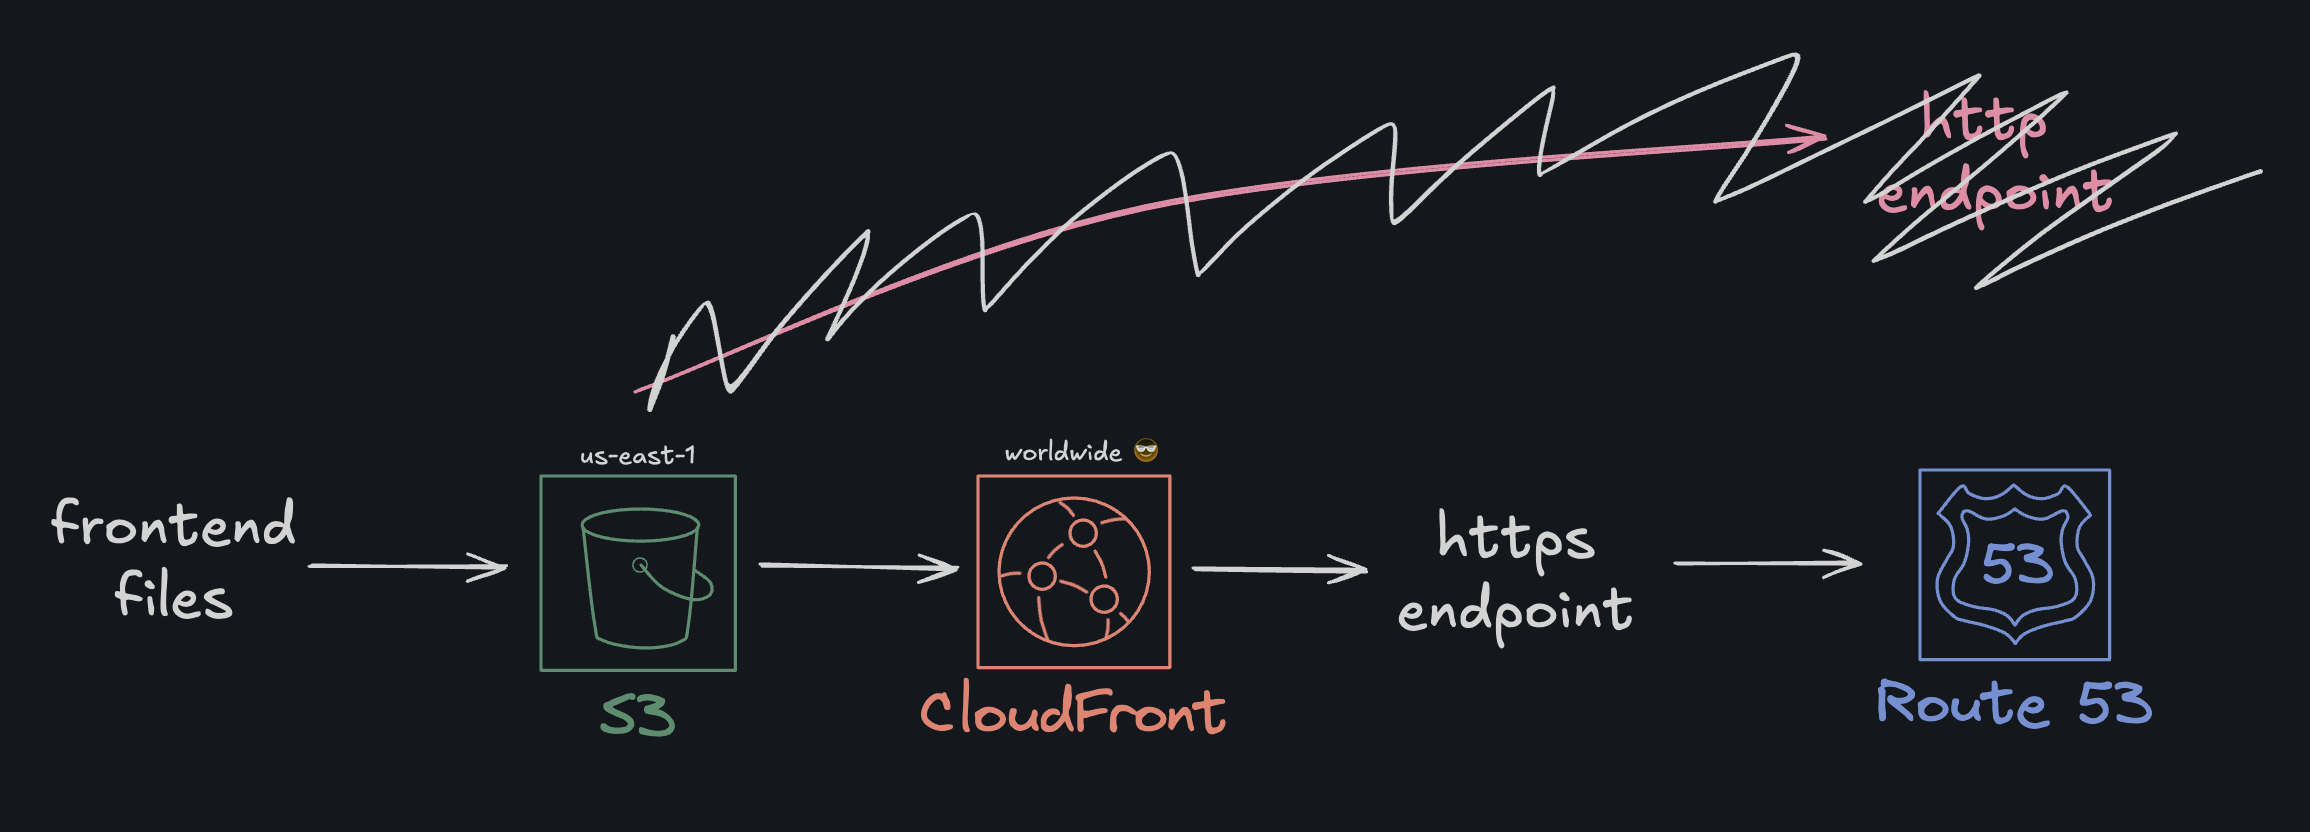
Aaaand voila, with that my personal website was live and ready for testing with the following basic architecture:
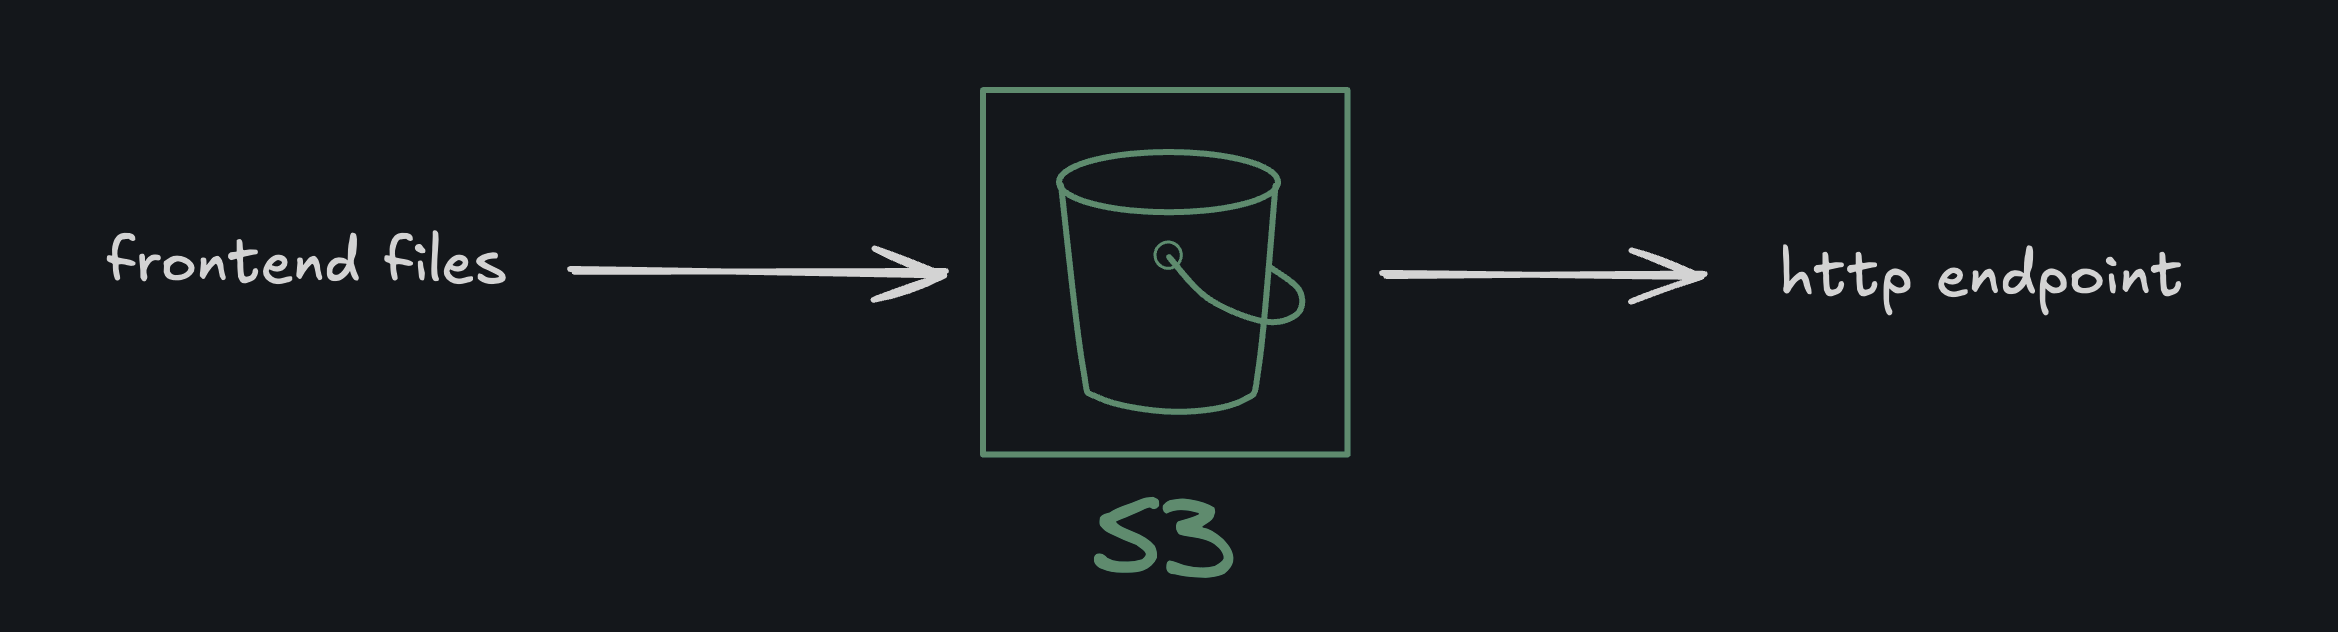
While this worked perfectly for a quick and dirty public website, there was one big limitation: the S3 website endpoint only supports HTTP.
This meant:
- Visitors would see the “Not Secure” warning in browsers.
- Any attempt to load the site over HTTPS would fail.
- Mixing this with HTTPS resources later would trigger mixed content errors.
For preliminary testing, that’s fine as it’s fast, cheap, and easy. But for a production site with a custom domain, I needed the following:
- HTTPS encryption so as to not be left in the 90s.
- Caching and edge distribution to speed up delivery worldwide.
Enter CloudFront
The natural next step is to put Amazon CloudFront in front of the S3 bucket.
CloudFront would:
- Serve the site over HTTPS with a free AWS Certificate Manager (ACM) TLS cert.
- Cache content at AWS edge locations globally for lower latency.
- Support custom domains via Route 53.
Intermission: Console → Terraform
It was around this time that I decided to commit to provisioning the remainder of the required AWS resources with Terraform. Terraform is an Infrastructure as Code (IAC) tool by HashiCorp/IBM that lets you define cloud resources in code rather than clicking through consoles.
At this stage, my S3 bucket was already provisioned entirely through the AWS Console.
From what I’d read online, bringing a console-created resource under Terraform usually meant manually writing matching HCL or relying on third-party tools like Terraformer to pull and sync the configuration(s).
So I was expecting a bit of pain here.
Instead, using Terraform’s own native tools, it just… worked. Not only did it import the bucket, it also pulled in the full configuration. No hand-writing needed. As they say in New Zealand, easy as.
Here’s what my import file looked like:
import {
  to = aws_s3_bucket.resume_site
  id = "REDACTED"
}

import {
  to = aws_s3_bucket_website_configuration.resume_site
  id = "REDACTED"
}

import {
  to = aws_s3_bucket_policy.public_read_access
  id = "REDACTED"
}
And here’s what I ran to execute the config-driven import from the CLI:
terraform init
terraform plan -generate-config-out=generated.tf
This then created the necessary hcl configs:
resource "aws_s3_bucket" "resume_site" {
  bucket = "REDACTED"

  tags = {
    Name        = "REDACTED"
    Environment = "Production"
  }
}

resource "aws_s3_bucket_website_configuration" "resume_site" {
  bucket = aws_s3_bucket.resume_site.bucket

  index_document {
    suffix = "index.html"
  }

  error_document {
    key = "404.html"
  }
}

resource "aws_s3_bucket_policy" "public_read_access" {
  bucket = aws_s3_bucket.resume_site.id

  policy = jsonencode({
    Version = "2012-10-17"
    Statement = [
      {
        Sid       = "PublicReadGetObject"
        Effect    = "Allow"
        Principal = "*"
        Action    = "s3:GetObject"
        Resource  = "${aws_s3_bucket.resume_site.arn}/*"
      }
    ]
  })
}
Note on Redactions:
I’ve intentionally redacted certain fields such as bucket names and identifying tags. At the time of writing this post, I’m still not 100% certain what could be considered a security vulnerability if revealed publicly. Rather than risk exposing something sensitive and making a fool of myself, I’ve chosen to err on the side of caution.
Seasoning the Stack: CloudFront and Route 53
As mentioned before the intermission to Terraform, the next sensible step in progressing this project was to figure out scalable distribution. The first version was fine for testing, but it had some pretty glaring downsides. It was only available over HTTP, and the site was stuck behind a long S3 endpoint URL that no one would ever remember.
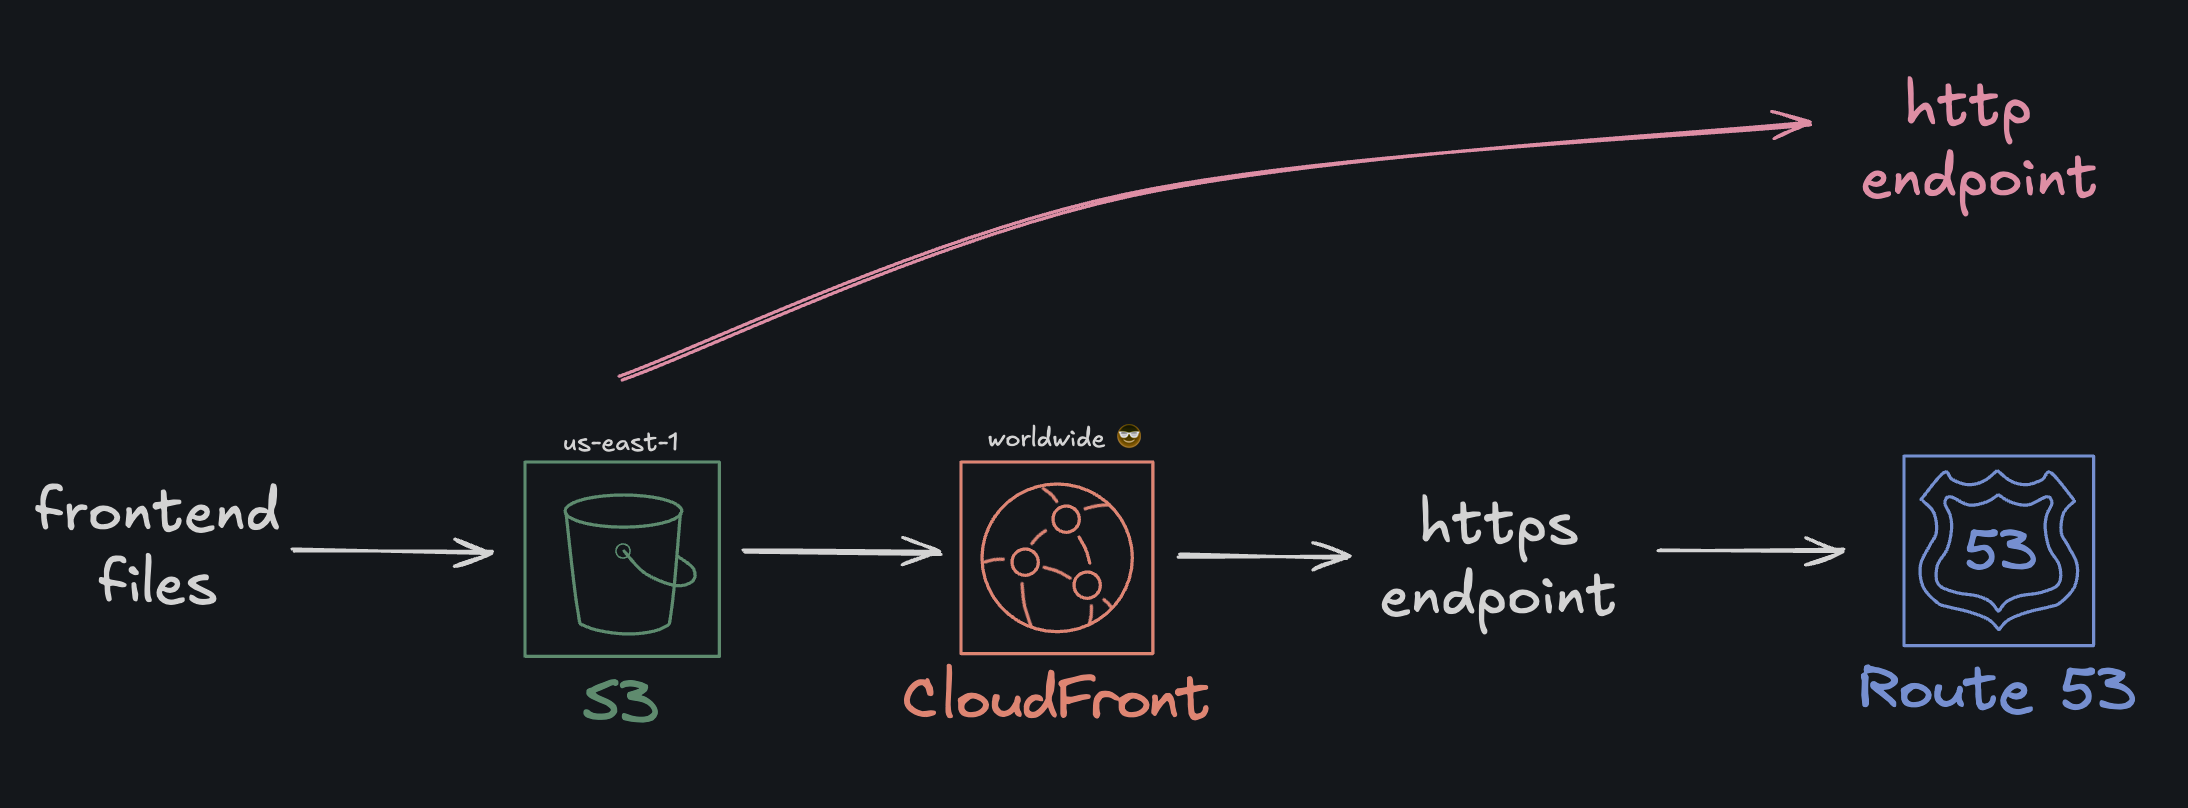
The fix seemed simple enough. Put CloudFront in front of the bucket. CloudFront would give me a nice clean HTTPS connection as well as speed things up with caching at AWS edge locations aroudn the globe.
The updated architecture would look as follows:

Step 1: Create the CloudFront distribution
At this point the bucket was still public, and I pointed CloudFront to the S3 website endpoint. This kept the S3 static site routing behavior I already had, while letting CloudFront handle HTTPS at the edge.
resource "aws_cloudfront_distribution" "cloud-resume-cf" {
  aliases                         = ["www.sengweiyeoh.com", "sengweiyeoh.com"]
  comment                         = "cloudfront distribution for my personal resume"
  enabled                         = true
  http_version                    = "http2"
  is_ipv6_enabled                 = true
  price_class                     = "PriceClass_All"
  wait_for_deployment             = true

  default_cache_behavior {
    allowed_methods        = ["GET", "HEAD"]
    cache_policy_id        = "658327ea-f89d-4fab-a63d-7e88639e58f6"
    cached_methods         = ["GET", "HEAD"]
    compress               = true
    default_ttl            = 0
    max_ttl                = 0
    min_ttl                = 0
    target_origin_id       = "sengwei-resume-site-2025.s3-website-us-east-1.amazonaws.com-md536837hkw"
    viewer_protocol_policy = "redirect-to-https"
    grpc_config {
      enabled = false
    }
  }

  origin {
    domain_name = "sengwei-resume-site-2025.s3-website-us-east-1.amazonaws.com"
    origin_id   = "sengwei-resume-site-2025.s3-website-us-east-1.amazonaws.com-md536837hkw"

    custom_origin_config {
      http_port                = 80
      https_port               = 443
      origin_keepalive_timeout = 5
      origin_protocol_policy   = "http-only"
      origin_read_timeout      = 30
      origin_ssl_protocols     = ["SSLv3", "TLSv1", "TLSv1.1", "TLSv1.2"]
    }
  }

  restrictions {
    geo_restriction {
      restriction_type = "none"
    }
  }

  viewer_certificate {
    acm_certificate_arn = aws_acm_certificate.cloud-resume-cert.arn
    ssl_support_method  = "sni-only"
  }
}
This setup worked and the site was now accessible on a cloudfront generated URL, served over HTTPS, and cached at the edge. But because I was using the website endpoint and had no OAC configured, the bucket still had to remain public. (More on this later, as it was a silly oversight).
Step 2: Registering my Custom Domain
With the CloudFront distribution working and serving my site over the default URL domain, it was time to get a shiny domain for myself.
After a little reading on Reddit and twitter, I opted to register my domain, Sengweiyeoh.com with Porkbun. I also price compared Route53’s domain marketplace and Porkbun’s and it definitely seemed cheaper through them. Here’s what it looked like in my Porkbun account at the time:
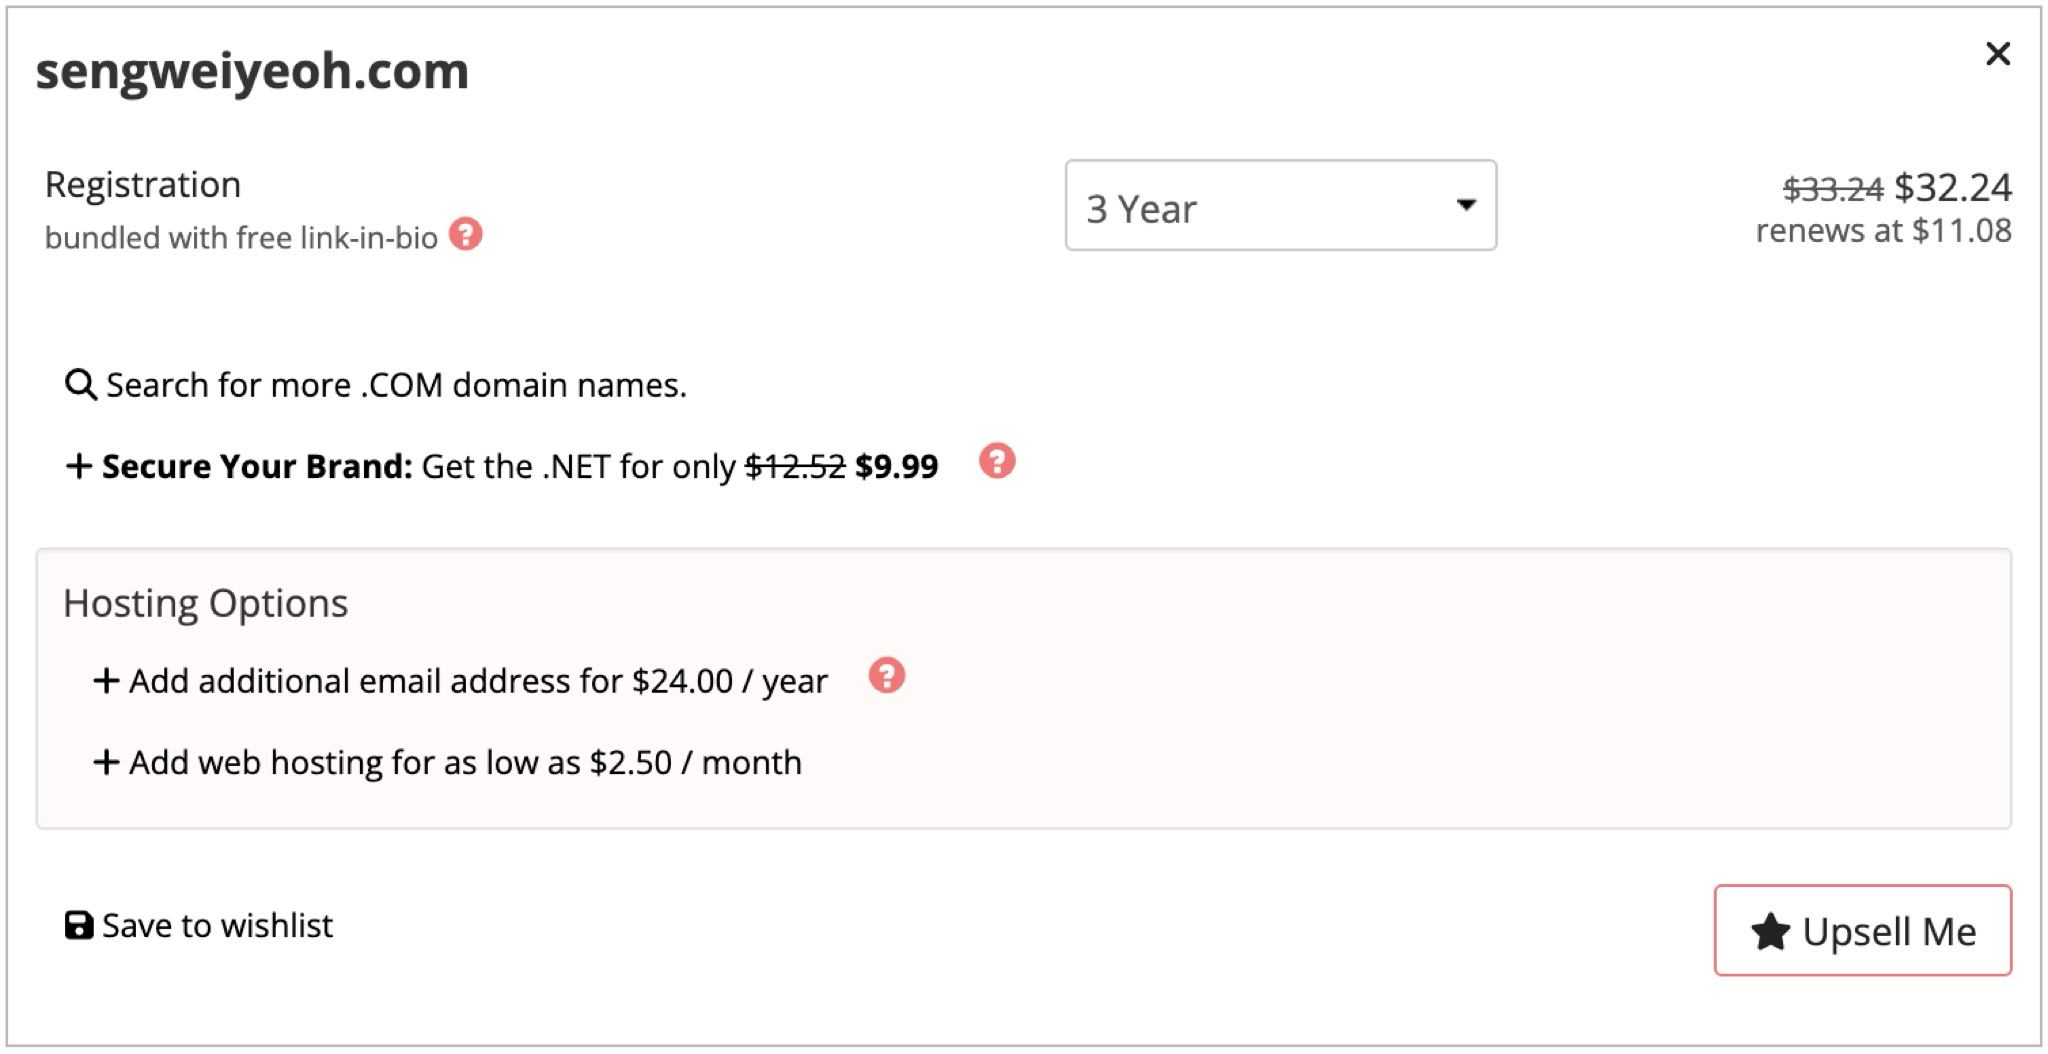
Since the domain wasn’t registered through AWS, I needed to create a hosted zone in Route 53 and point Porkbun’s nameservers to AWS. This would let me manage DNS records for the domain directly from Route 53.
resource "aws_route53_zone" "cloud-resume-hz" {
  name = "sengweiyeoh.com"
}
Next, I replaced the default nameservers with the four provided by Route 53. DNS propagation was nearly instant (to my surprise).

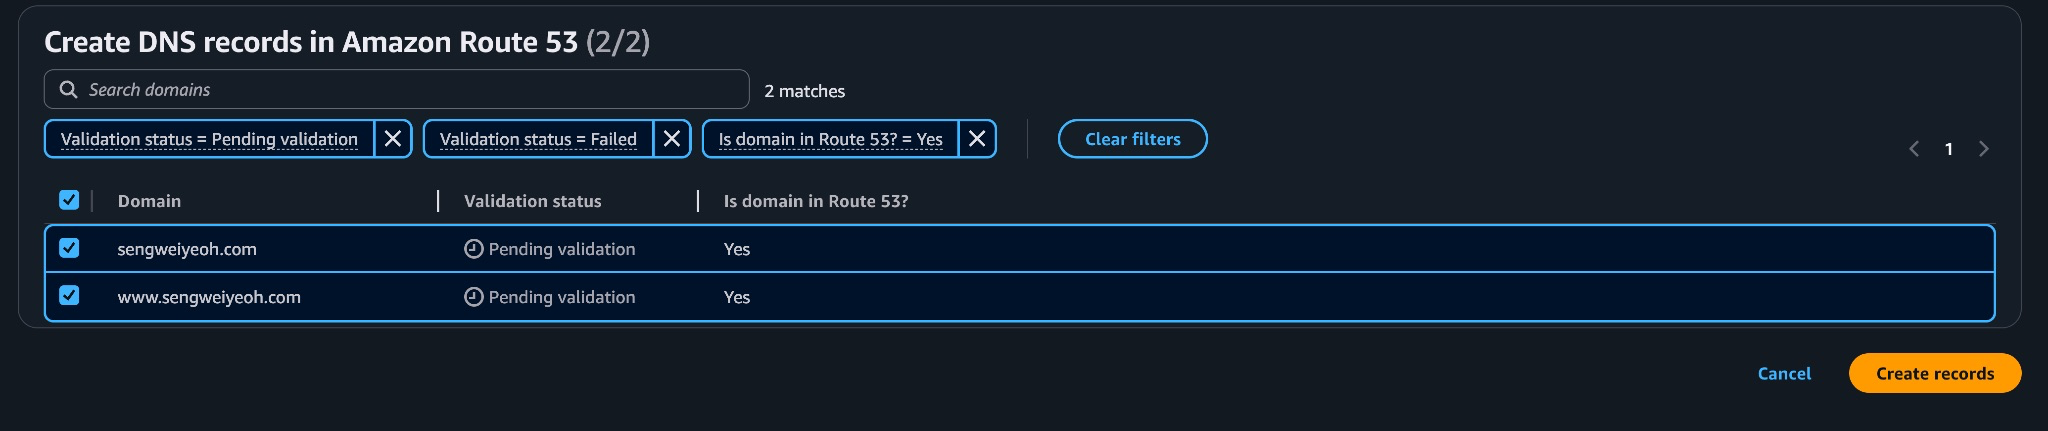
Once the nameservers were pointing to Route 53, I could start adding records for my domain including an A record alias to CloudFront.
The next step was to request a certificate for both my root domain and the www subdomain. Since CloudFront looks for certificates in us-east-1, I made sure to create it there.
provider "aws" {
  region = "us-east-1"
}

resource "aws_acm_certificate" "cloud-resume-cert" {
  domain_name               = "sengweiyeoh.com"
  validation_method         = "DNS"
  subject_alternative_names = ["www.sengweiyeoh.com"]
}

With CloudFront deployed and the certificate ready, the final step was to wire up DNS so both my root domain and the www subdomain pointed to the distribution.
resource "aws_route53_zone" "cloud-resume-hz" {
  name = "sengweiyeoh.com"
}

resource "aws_route53_record" "www" {
  zone_id = aws_route53_zone.cloud-resume-hz.zone_id
  name    = "www.${aws_route53_zone.cloud-resume-hz.name}"
  type    = "A"

  alias {
    name                   = aws_cloudfront_distribution.cloud-resume-cf.domain_name
    zone_id                = aws_cloudfront_distribution.cloud-resume-cf.hosted_zone_id
    evaluate_target_health = false
  }
}

resource "aws_route53_record" "root" {
  zone_id = aws_route53_zone.cloud-resume-hz.zone_id
  name    = aws_route53_zone.cloud-resume-hz.name
  type    = "A"

  alias {
    name                   = aws_cloudfront_distribution.cloud-resume-cf.domain_name
    zone_id                = aws_cloudfront_distribution.cloud-resume-cf.hosted_zone_id
    evaluate_target_health = false
  }
}
 Once DNS changes propagated, the site was live on my domain with HTTPS and CloudFront in front. The bucket was still public, which I knew I’d eventually want to change. The next step in my journey would be learning about Origin Access Control and how to properly lock S3 down while keeping CloudFront as the front door.
Shutting the Lid: Making S3 Private
I realized the bucket was still public, which meant anyone could load content directly from the S3 website URL, bypassing CloudFront. For a personal website, I hardly imagine that this would be a problem, but still seemed like a security vulnerability that needed to be addressed.
Not Technically Precise
Before anyone gives me hell for illustrating the flow this way and how CloudFront doesnt feed data into Route53 as my illustration suggests, please do know that it’s just the way I think is simplest to illustrate
To address this, I had to switch the CloudFront origin to the S3 REST endpoint, add an Origin Access Control (OAC), turn website hosting OFF, enable Block Public Access, and update the bucket policy to only allow the CloudFront distribution. This would effectively paint an updated and hopefully more secure architeture as follows:
Okay. First things first, to create the OAC, I added the following resource block to my cloud config file:
resource "aws_cloudfront_origin_access_control" "cloud_resume_s3_oac" {
  name                              = "cloud_resume_s3_oac"
  description                       = "OAC for s3 bucket"
  origin_access_control_origin_type = "s3"
  signing_behavior                  = "always"
  signing_protocol                  = "sigv4"
}
Previously this origin used the website endpoint with custom_origin_config. Now it uses the REST endpoint with s3_origin_config {} and the OAC.
resource "aws_cloudfront_distribution" "cloud-resume-cf" {
  aliases         = ["www.sengweiyeoh.com", "sengweiyeoh.com"]
  comment         = "cloudfront distribution for my personal resume"
  enabled         = true
  http_version    = "http2"
  is_ipv6_enabled = true
  price_class     = "PriceClass_All"
  wait_for_deployment = true

  # origin now points to REST endpoint + OAC
  origin {
    origin_id   = "resume-site-rest"
    domain_name = "${aws_s3_bucket.resume_site.bucket}.s3.us-east-1.amazonaws.com"

    origin_access_control_id = aws_cloudfront_origin_access_control.cloud_resume_s3_oac.id
    s3_origin_config {} # REST origin; no values needed
  }

  default_cache_behavior {
    target_origin_id       = "resume-site-rest"
    allowed_methods        = ["GET", "HEAD"]
    cached_methods         = ["GET", "HEAD"]
    viewer_protocol_policy = "redirect-to-https"
    cache_policy_id        = "658327ea-f89d-4fab-a63d-7e88639e58f6" # AWS Managed-CachingOptimized
    compress               = true
    default_ttl            = 0
    max_ttl                = 0
    min_ttl                = 0
  }

  restrictions {
    geo_restriction {
      restriction_type = "none"
    }
  }

  viewer_certificate {
    acm_certificate_arn = aws_acm_certificate.cloud-resume-cert.arn
    ssl_support_method  = "sni-only"
  }
}
I also had to turn off S3 website hosting by removing the following block:
- resource "aws_s3_bucket_website_configuration" "resume_site" {
-   bucket = aws_s3_bucket.resume_site.bucket
-
-   index_document { suffix = "index.html" }
-   error_document { key = "404.html" }
- }
Additionally, I blocked public access and enforced bucket owner object ownership:
resource "aws_s3_bucket_public_access_block" "resume_site" {
  bucket                  = aws_s3_bucket.resume_site.id
  block_public_acls       = true
  ignore_public_acls      = true
  block_public_policy     = true
  restrict_public_buckets = true
}

resource "aws_s3_bucket_ownership_controls" "resume_site" {
  bucket = aws_s3_bucket.resume_site.id
  rule {
    object_ownership = "BucketOwnerEnforced"
  }
}
Finally, I replaced the Public-read only policy with an OAC-only policy
resource "aws_s3_bucket_policy" "cloudfront_access" {
  bucket = aws_s3_bucket.resume_site.id

  policy = jsonencode({
    Version = "2012-10-17",
    Statement = [{
      Effect: "Allow",
      Principal: { Service: "cloudfront.amazonaws.com" },
      Action: "s3:GetObject",
      Resource: "${aws_s3_bucket.resume_site.arn}/*",
      Condition: {
        StringEquals: {
          "AWS:SourceArn": aws_cloudfront_distribution.cloud-resume-cf.arn
        }
      }
    }]
  })
}
Now I have a streamlined setup where Route 53 points to a CloudFront distribution, CloudFront serves content from my S3 bucket over HTTPS, and the S3 bucket is fully private and only accessible through CloudFront.
The next objective of this project was to add a ticket counter in an entirely serverless manner. Since this project has been entirely within the AWS ecosystem, Lambda and DynamoDB made the most sense to proceed with.
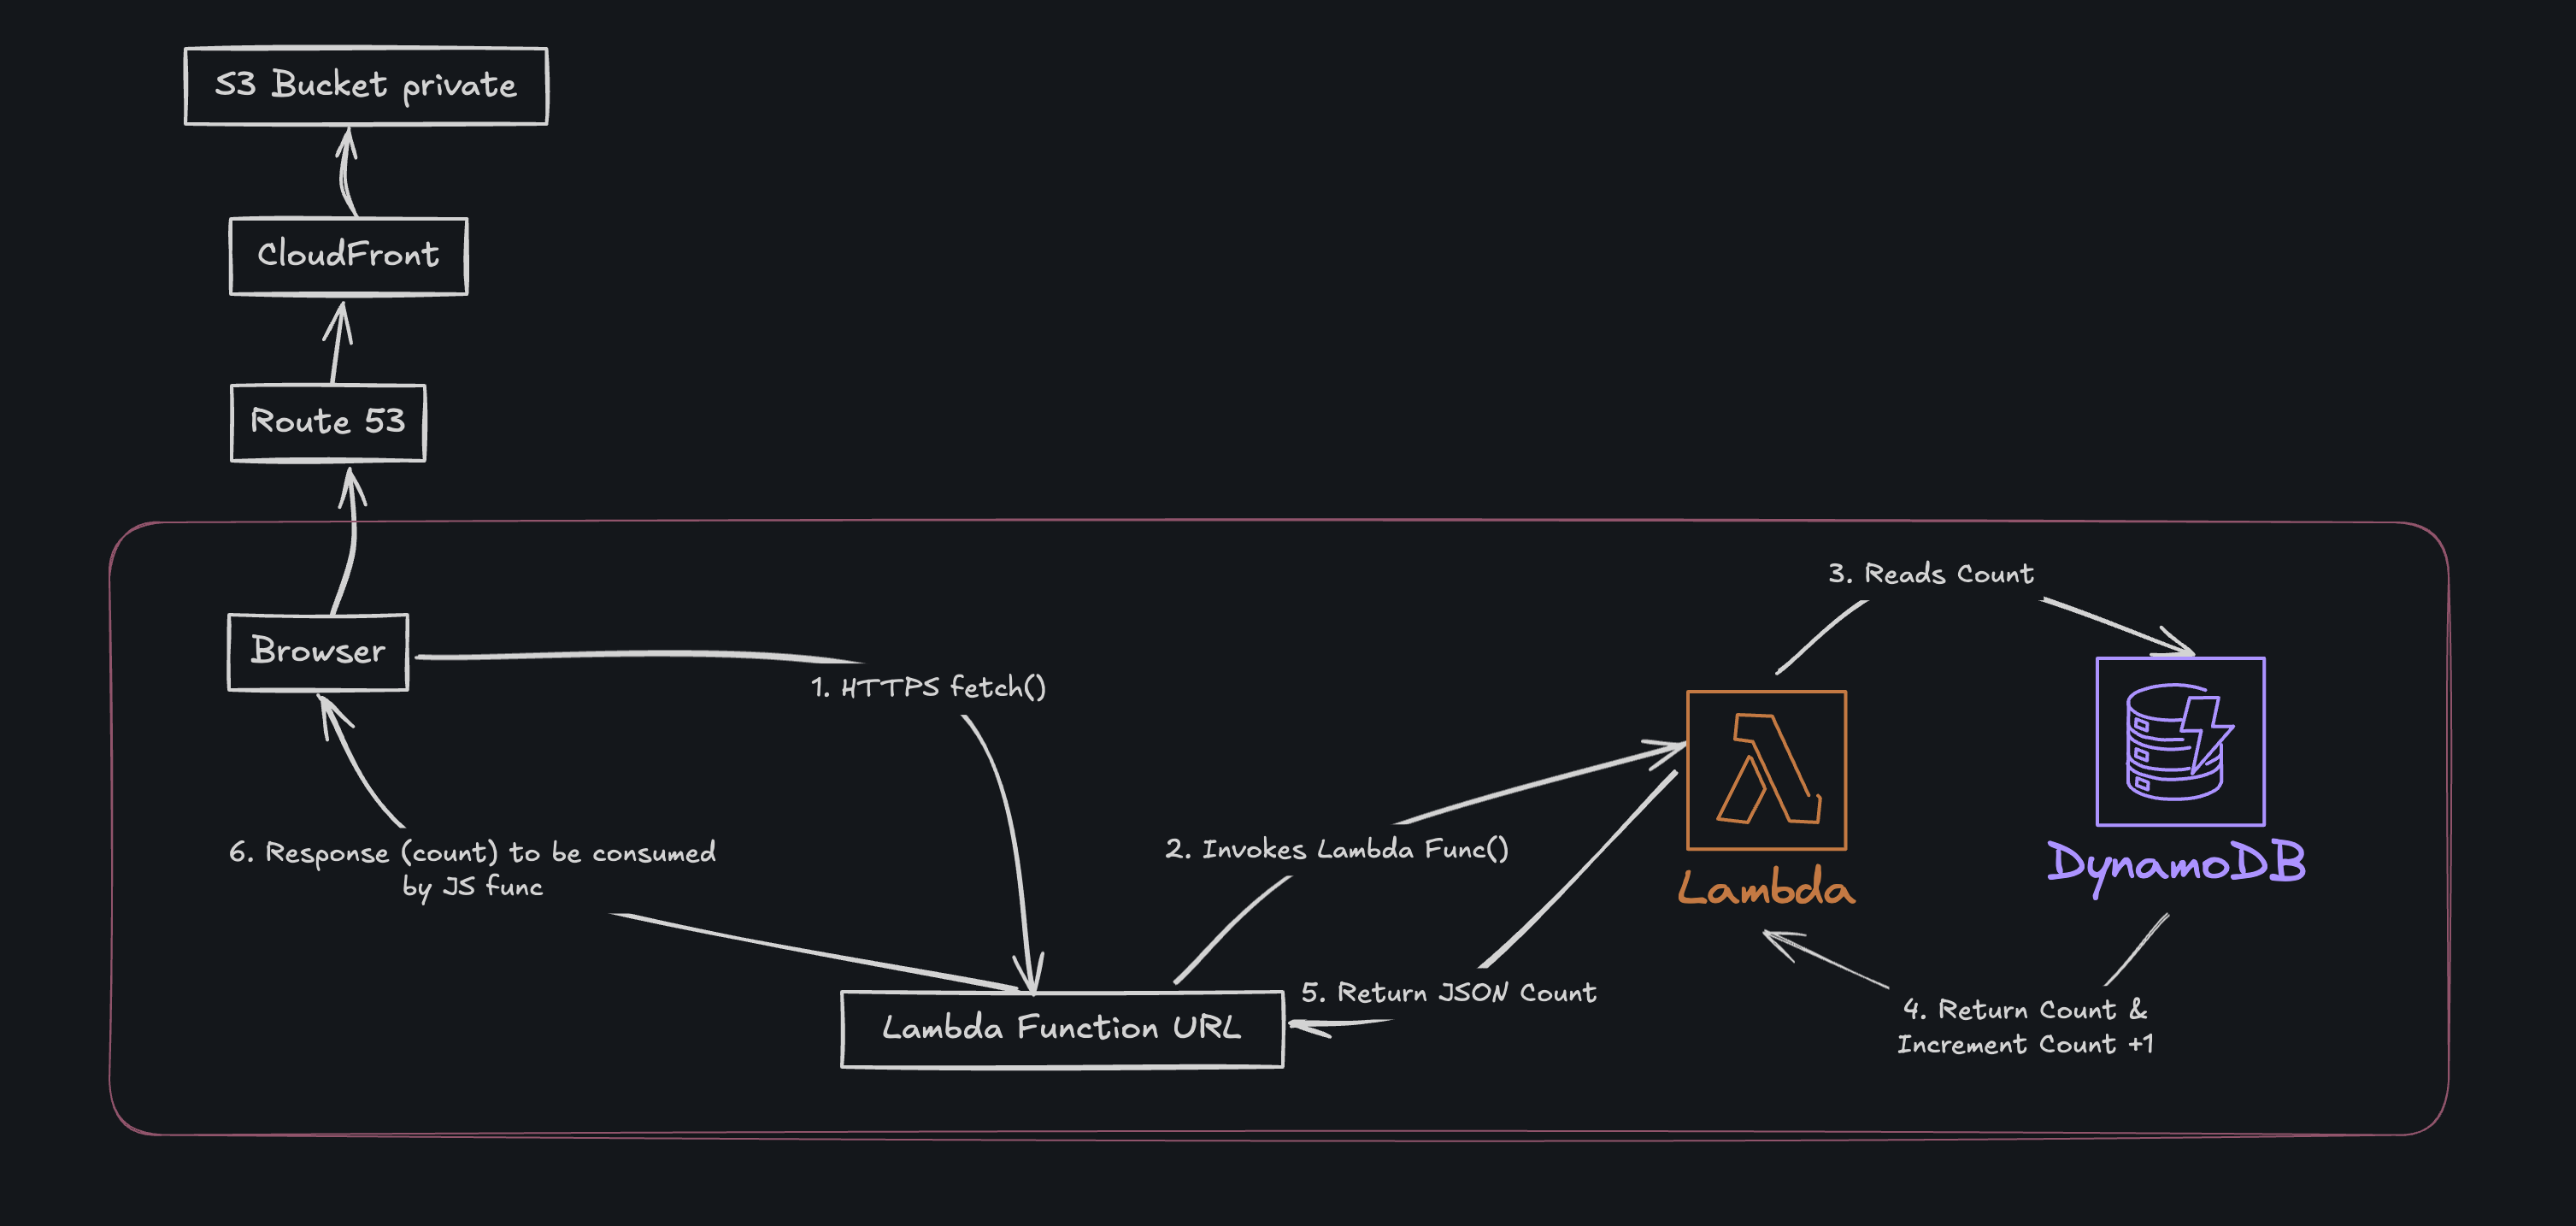
The idea was fairly simple: every time someone visited the site, a Lambda function would run to increment a counter stored in a backend datastore. This would let me display a live “visitor count” on the site, while keeping it completely serverless. The architecutre would look roughly like this:
Part 1: DynamoDB
First things first, I needed a place to store the visitor count. DynamoDB was a perfect fit—serverless, scalable, and quick to set up with Terraform.
resource "aws_dynamodb_table" "visitor_counter" {
  name         = "resume-visitor-counter"
  billing_mode = "PAY_PER_REQUEST"
  hash_key     = "id"

  attribute {
    name = "id"
    type = "S"
  }
}

resource "aws_dynamodb_table_item" "visitor_count_initialization" {
  table_name = aws_dynamodb_table.visitor_counter.name
  hash_key   = aws_dynamodb_table.visitor_counter.hash_key

  item = jsonencode({
    id = {
      S = "visitor_count"
    }
    count = {
      N = "0"
    }
  })

  lifecycle {
    ignore_changes = [item]
  }
}
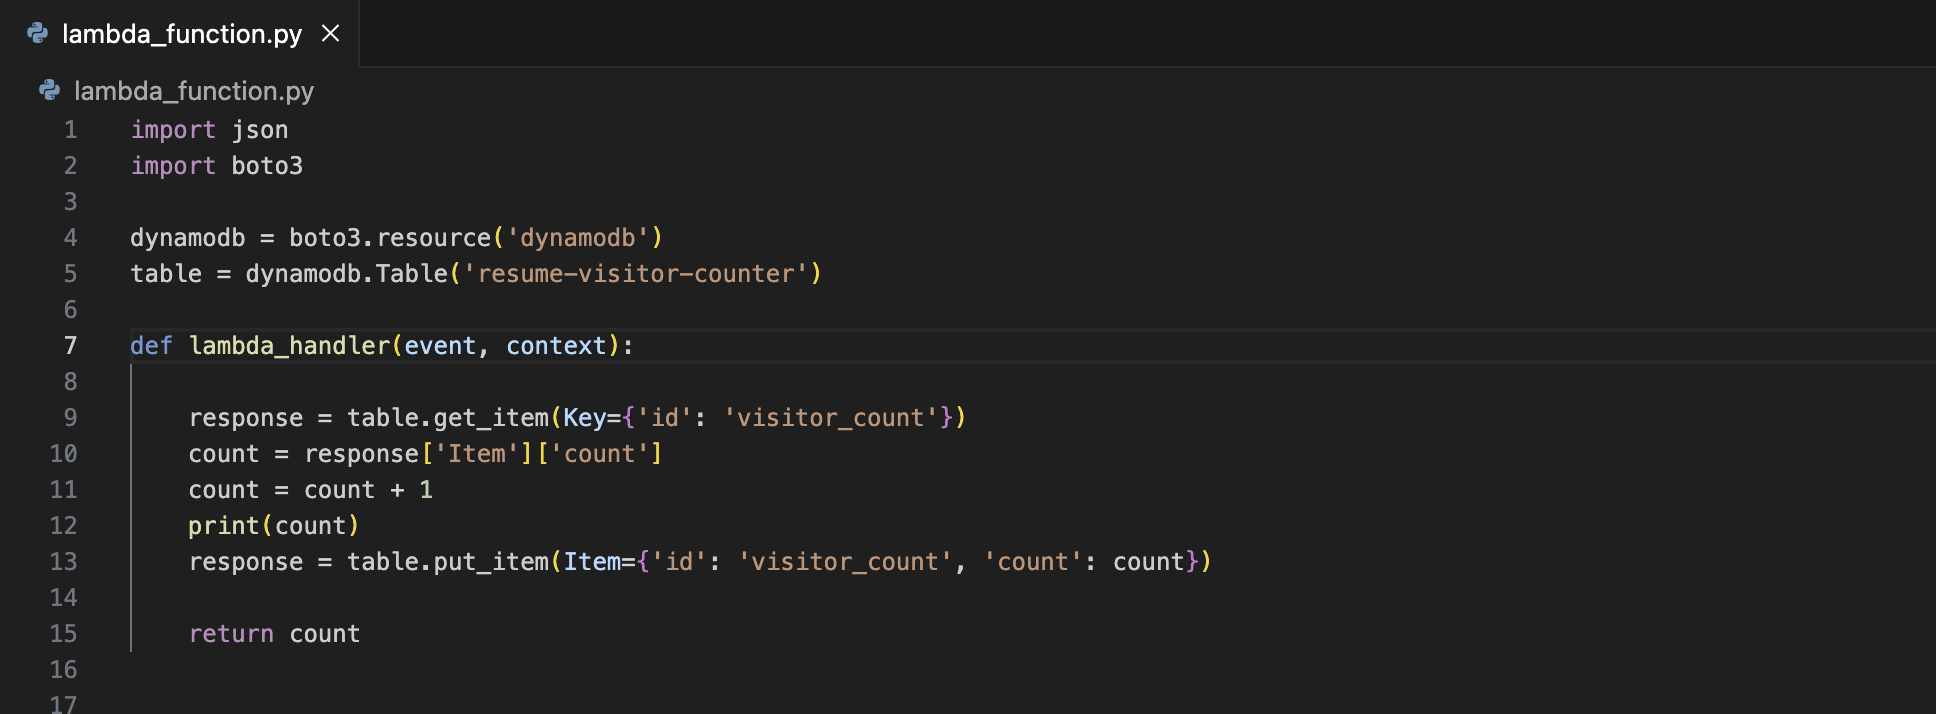
Part 2: The Lambda Function
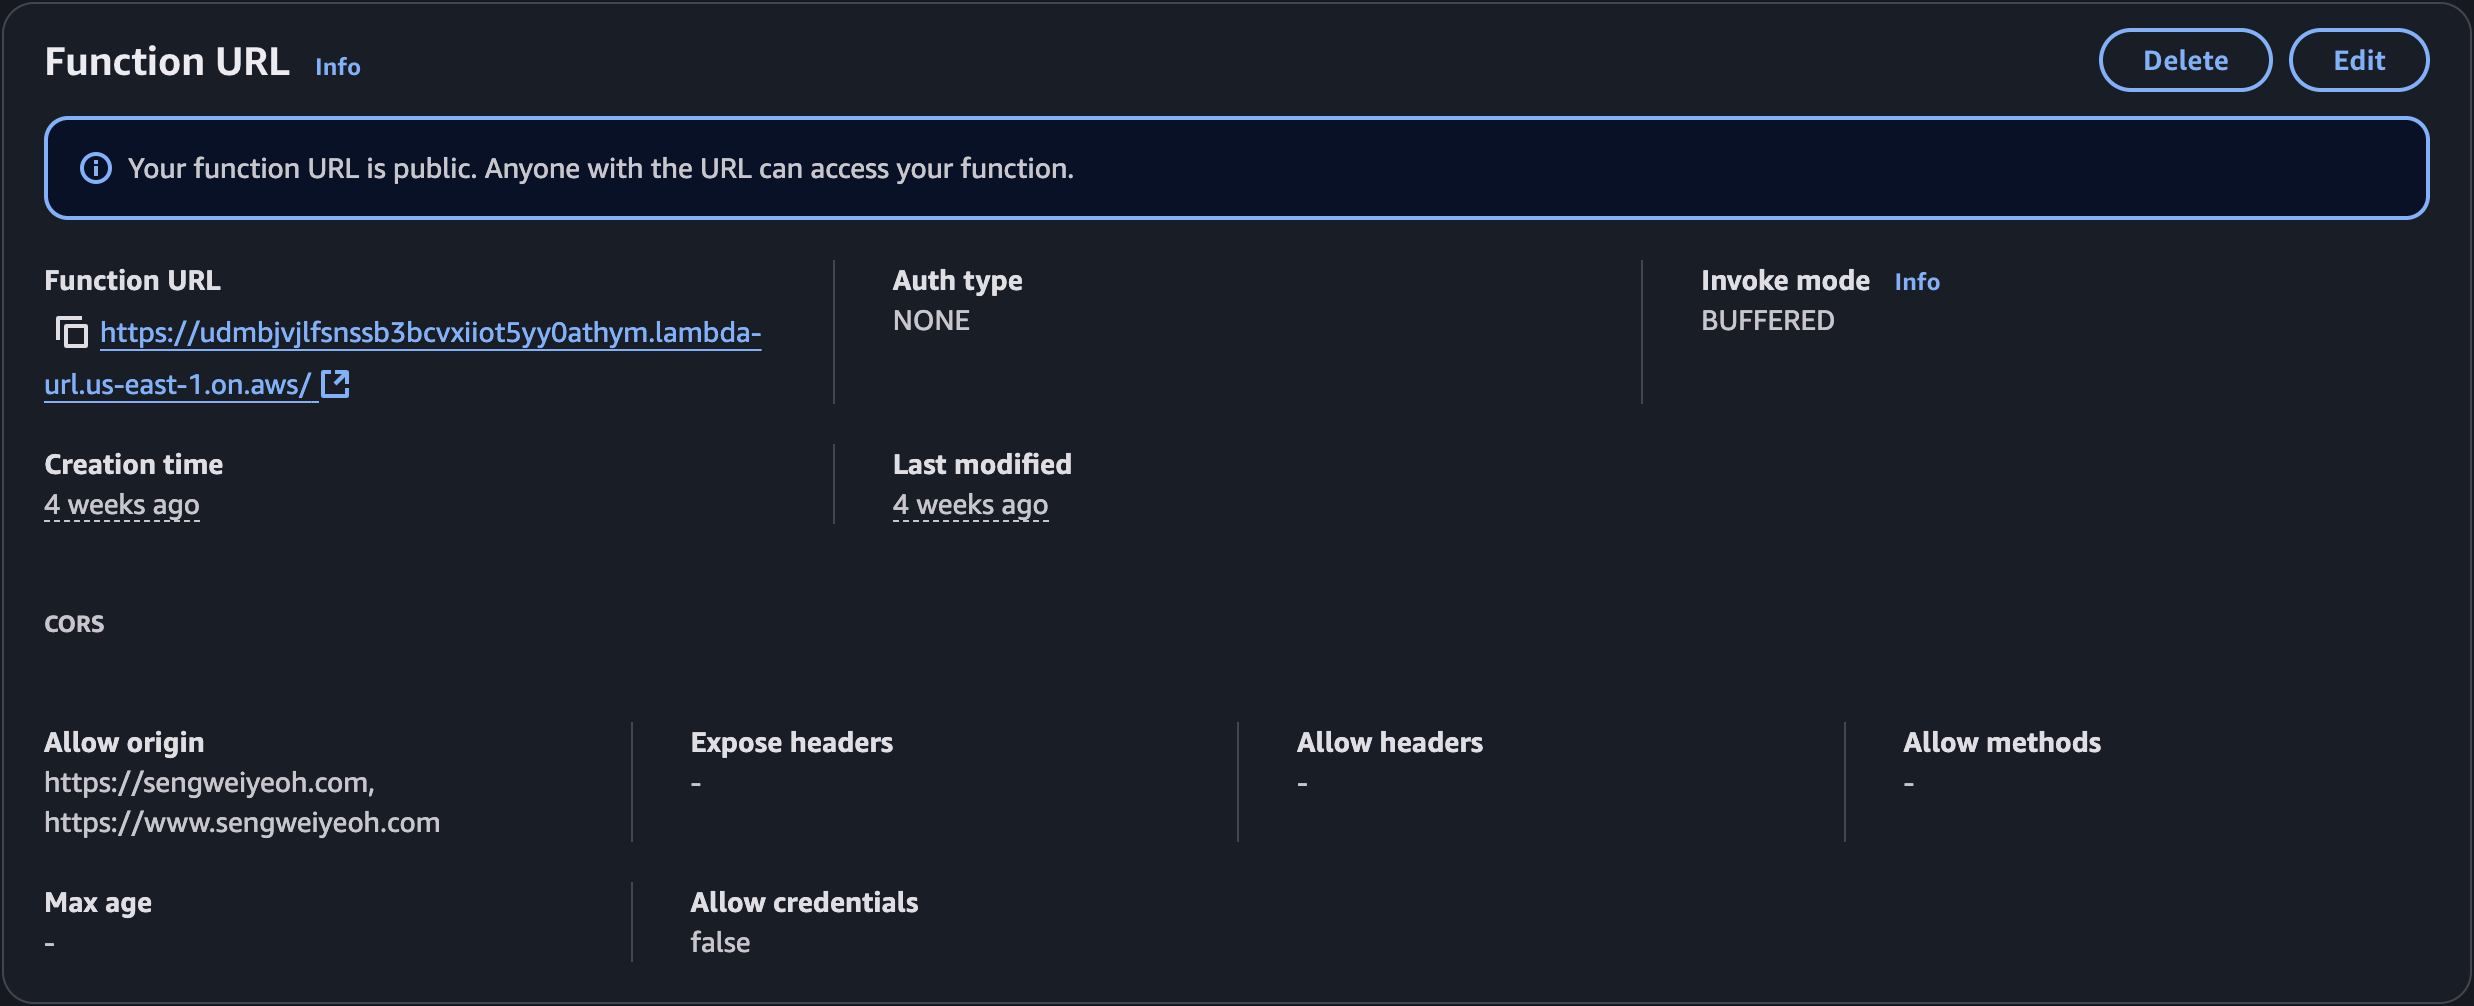
I created the Lambda directly in the AWS Console and exposed it with a Lambda Function URL, which my frontend would then call with fetch().
Btw in case you’re wondering why I created this Lambda function in the console, I don’t have a good answer for you. Iirc I was just tinkering around and one thing lead to the next and all of a sudden I had a function that I was then too lazy to import into Terraform.
Next, I configured a Lambda Function URL and set Auth type = NONE so the browser could call it directly. Since that makes the endpoint public, I locked down CORS to only allow my site to call said function.
Part 3: Hooking It Up to the Frontend
With the Lambda function live and exposed through a public URL, the last step was to connect it to my site so visitors could see the counter update in real time. I added a small placeholder in my HTML:
<span id="visitor-count">0</span>
Then, with the magic of JS scripting, I called the Lambda URL and updated that placeholder with the returned value:
// Fetch visitor count
async function fetchVisitorCount() {
    const response = await fetch('https://udmbjvjlfsnssb3bcvxiiot5yy0athym.lambda-url.us-east-1.on.aws/');
    console.log('Response status:', response.status);
    const data = await response.json();
    document.getElementById('visitor-count').textContent = data;
}
When a visitor loads the page, fetchVisitorCount() is called, retrieves the current count from DynamoDB via Lambda, increments it, and updates the text on the page.
I had to make a couple of concessions with this visitor counter setup. First, the visitor count increments on every page load, even for the same user, which means the number isn’t a true reflection of unique visitors and can be artificially inflated. Second, despite configuring the Lambda function to only allow requests from my domain, I found during testing that I could still invoke it from a private browser session. I haven’t fully investigated why this happens yet, but I’m not overly concerned for now. If someone does decide to spam the function, I have AWS price alerts in place to catch unusual activity.
The Cherry on Top: CI/CD with GitHub Actions
Up to this point, whenever I made changes to the frontend, I had to go through the whole routine of uploading the /public folder to S3 and manually invalidating the cache so the changes would show up instantly. That is, until GitHub Actions came along to make my life a whole lot easier.
I understand GitHub Actions to be like a little robot that sits in your repo, waiting for you to make changes. As soon as you push new code, it wakes up and runs a list of tasks you’ve told it to do.
In my case: build my site, upload it to S3, and clear CloudFront’s cache so the updates show up right away. No more doing all that by hand every time I tweak something .
A GitHub Actions workflow is just a YAML file that tells GitHub when to run something and what to do.
For all of this to work, I needed to add a few Repository Secrets that my actions will reference (in order to access the necessary AWS resources):
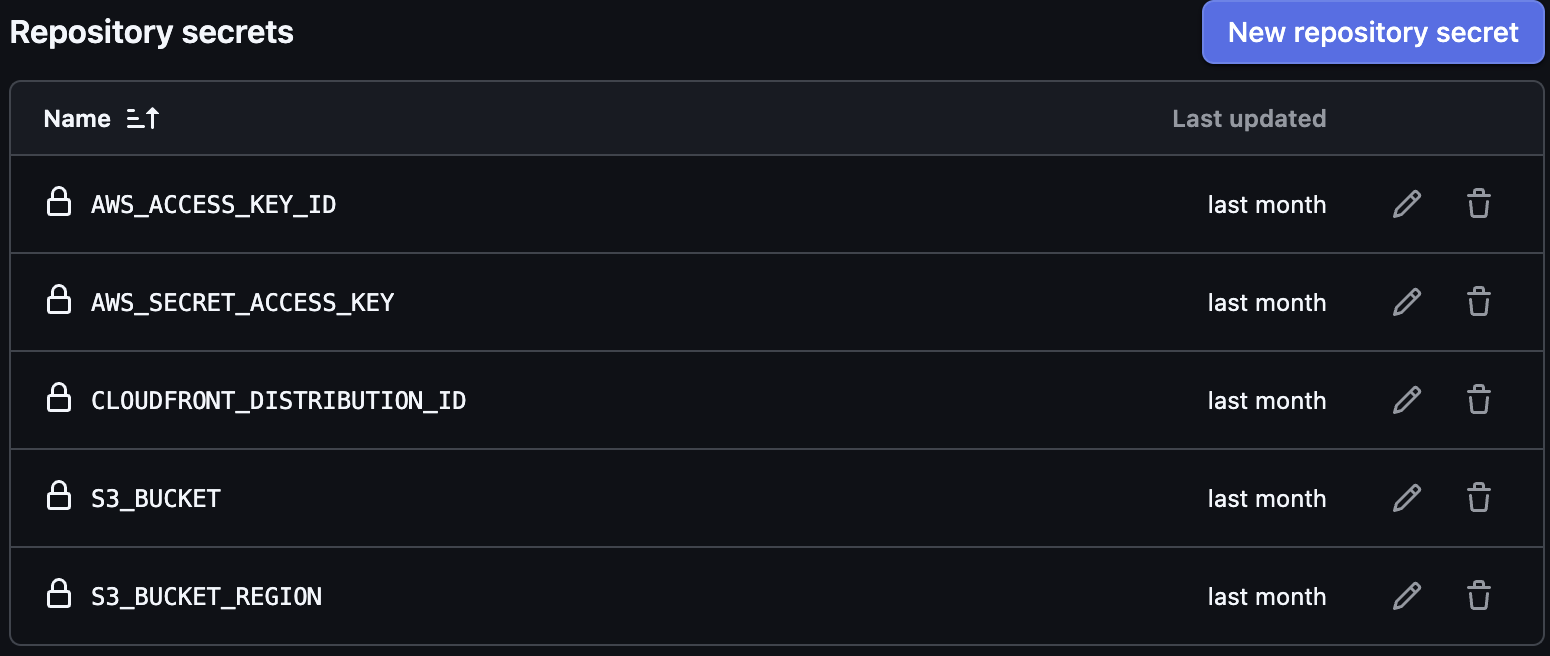
Here are the main parts of my GitHub Actions configuration:
Trigger: only when the frontend changes
Only pushes to main that touch files under frontend/ kick off a deploy. Backend-only commits won’t unnecessarily rebuild the site.
on:
  push:
    branches: [ main ]
    paths:
      - 'frontend/**'
Job setup: runner, minimal permissions, region and creds
- Uses the latest Ubuntu runner.
- Read-only repo access is enough for a static build.
- AWS creds/region come from repo secrets so nothing sensitive is in the repo.
jobs:
  deploy:
    runs-on: ubuntu-latest
    permissions:
      contents: read
    env:
      AWS_ACCESS_KEY_ID: ${{ secrets.AWS_ACCESS_KEY_ID }}
      AWS_SECRET_ACCESS_KEY: ${{ secrets.AWS_SECRET_ACCESS_KEY }}
      AWS_REGION: us-east-1
The job then has a few steps it’ll execute.
Step 1: Grab the code
Pulls the repository onto the runner so subsequent steps can read frontend/.
- name: Checkout code
  uses: actions/checkout@v3
Step 2: Install Hugo (the site generator)
Installs Hugo (extended) so the site can be built. “Latest” keeps things fresh but you can pin a version later for reproducible builds.
- name: Install Hugo
  uses: peaceiris/actions-hugo@v2
  with:
    hugo-version: 'latest'
Step 3: Build static site
Runs Hugo inside frontend/. Output lands in frontend/public/. –minify shrinks HTML/CSS/JS for faster loads.
- name: Build Hugo site
  run: cd frontend && hugo --minify
Step 4: Sync to S3
- Copies the built files to your S3 bucket.
- –delete removes files in S3 that no longer exist in public/ so the bucket mirrors the build exactly.
- This action wraps aws s3 sync, so it’s fast and simple.
- uses: jakejarvis/s3-sync-action@master
  with:
    args: --follow-symlinks --delete
  env:
    AWS_S3_BUCKET: ${{ secrets.S3_BUCKET }}
    AWS_ACCESS_KEY_ID: ${{ secrets.AWS_ACCESS_KEY_ID }}
    AWS_SECRET_ACCESS_KEY: ${{ secrets.AWS_SECRET_ACCESS_KEY }}
    SOURCE_DIR: 'frontend/public'
Step 5: Invalidate CloudFront Cache
Tells CloudFront to purge cached files so visitors get the new build immediately.
- name: Invalidate CloudFront
  uses: chetan/invalidate-cloudfront-action@v2
  env:
    PATHS: '/*'
    AWS_REGION: 'us-east-1'
    DISTRIBUTION: ${{ secrets.CLOUDFRONT_DISTRIBUTION_ID }}
    AWS_ACCESS_KEY_ID: ${{ secrets.AWS_ACCESS_KEY_ID }}
    AWS_SECRET_ACCESS_KEY: ${{ secrets.AWS_SECRET_ACCESS_KEY }}
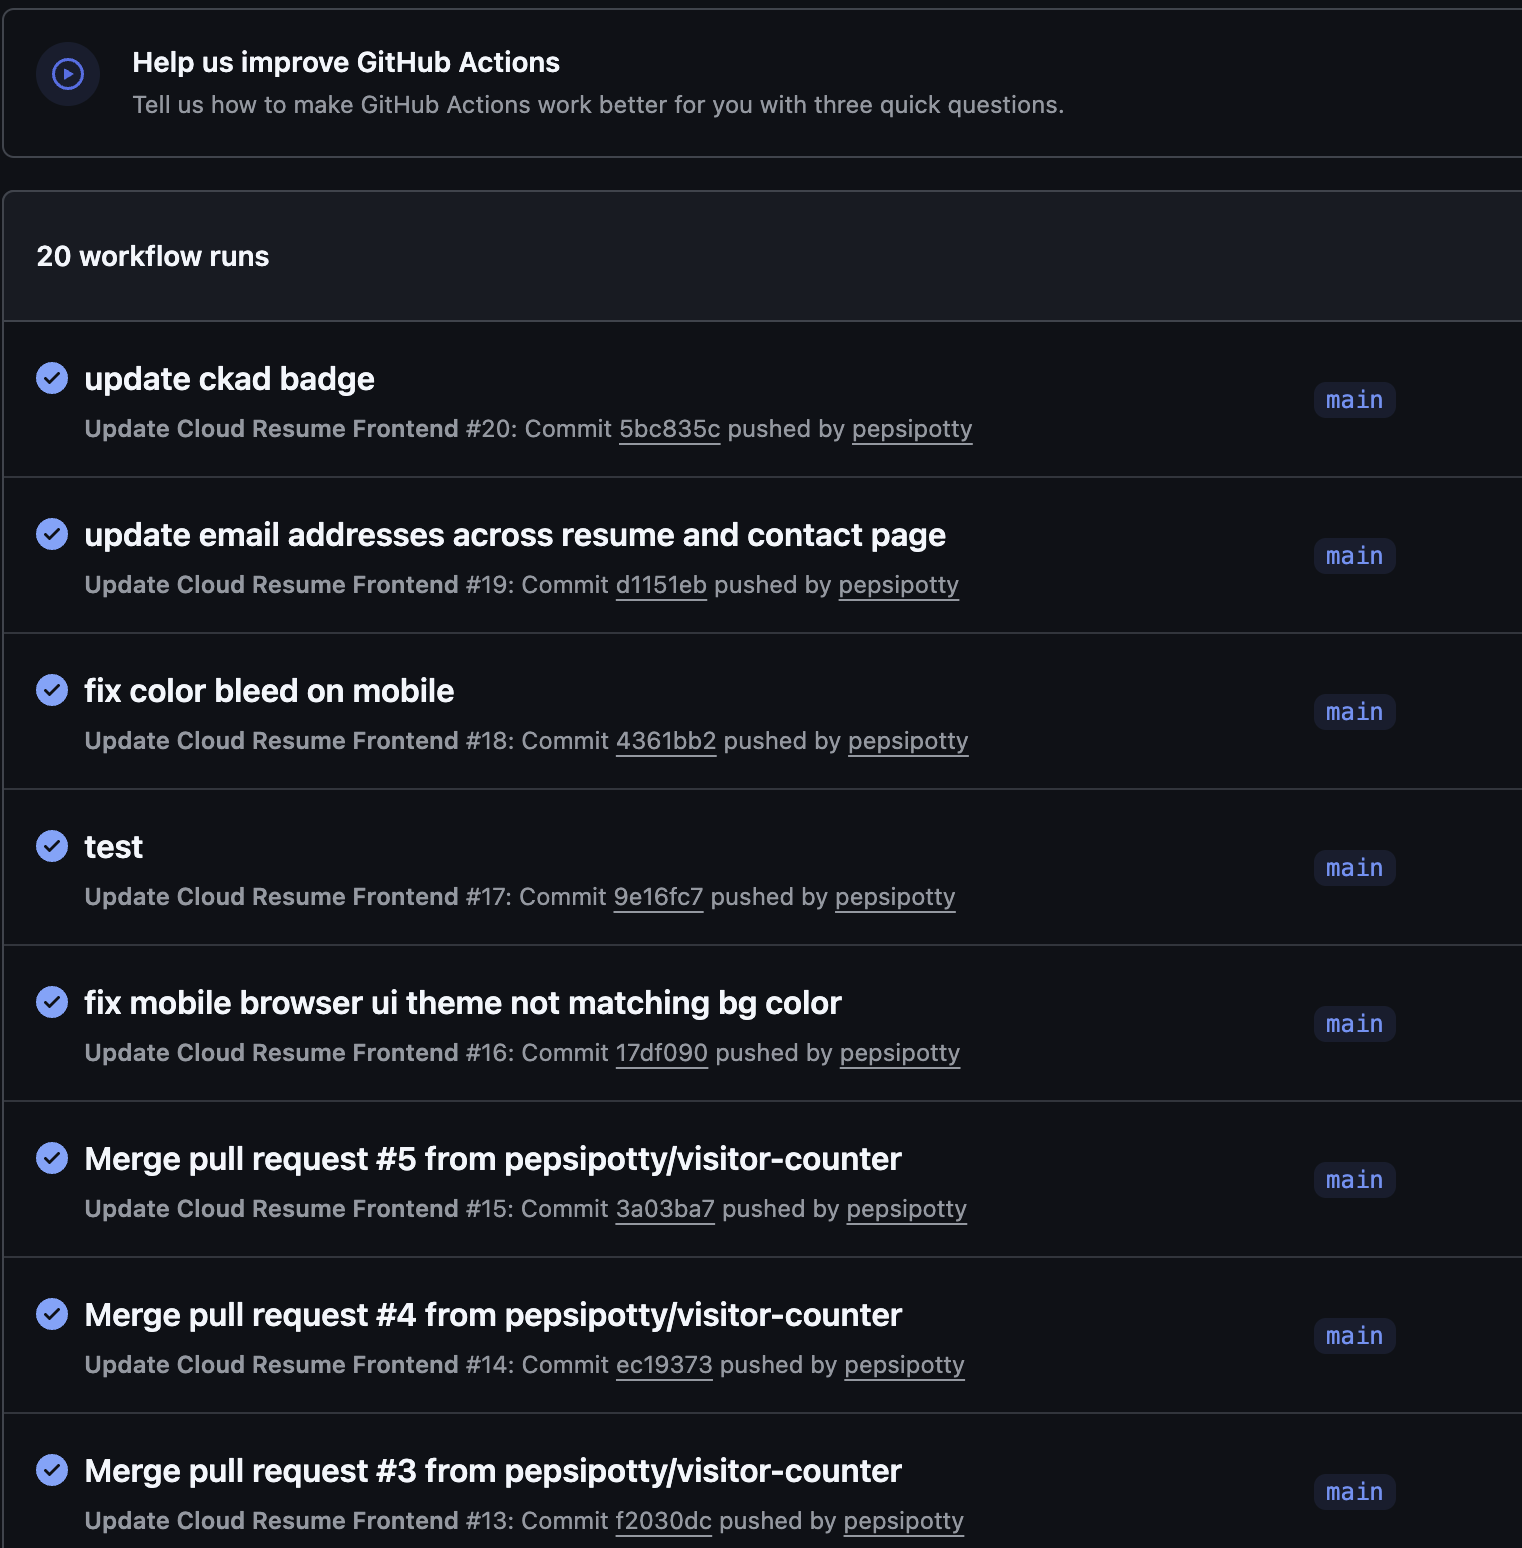
At the time of writing, this handy action has been an absolute time saver and has executed whenever I’ve pushed changes to my repo! Definitely recommend that you configure this very early on if you embark on your own website project.
Dinner is Served: What did I just make?
From seasoning the stack, shutting the lid, and adding a cherry on top of it all, I somehow ended up with a fully functional personal website.
It started as a way to learn AWS services while studying for the AWS SAA and Terraform certifications, but also as a way to follow along with Forrest Brazeal’s Cloud Resume Challenge. Over time it grew into something more complete, with Terraform-managed infrastructure, serverless visitor tracking, a custom domain, HTTPS, and automated deployments.
Below is the final architecture in all its glory, illustrated with a bit more effort and care for accuracy than the quick doodles earlier in the blog:
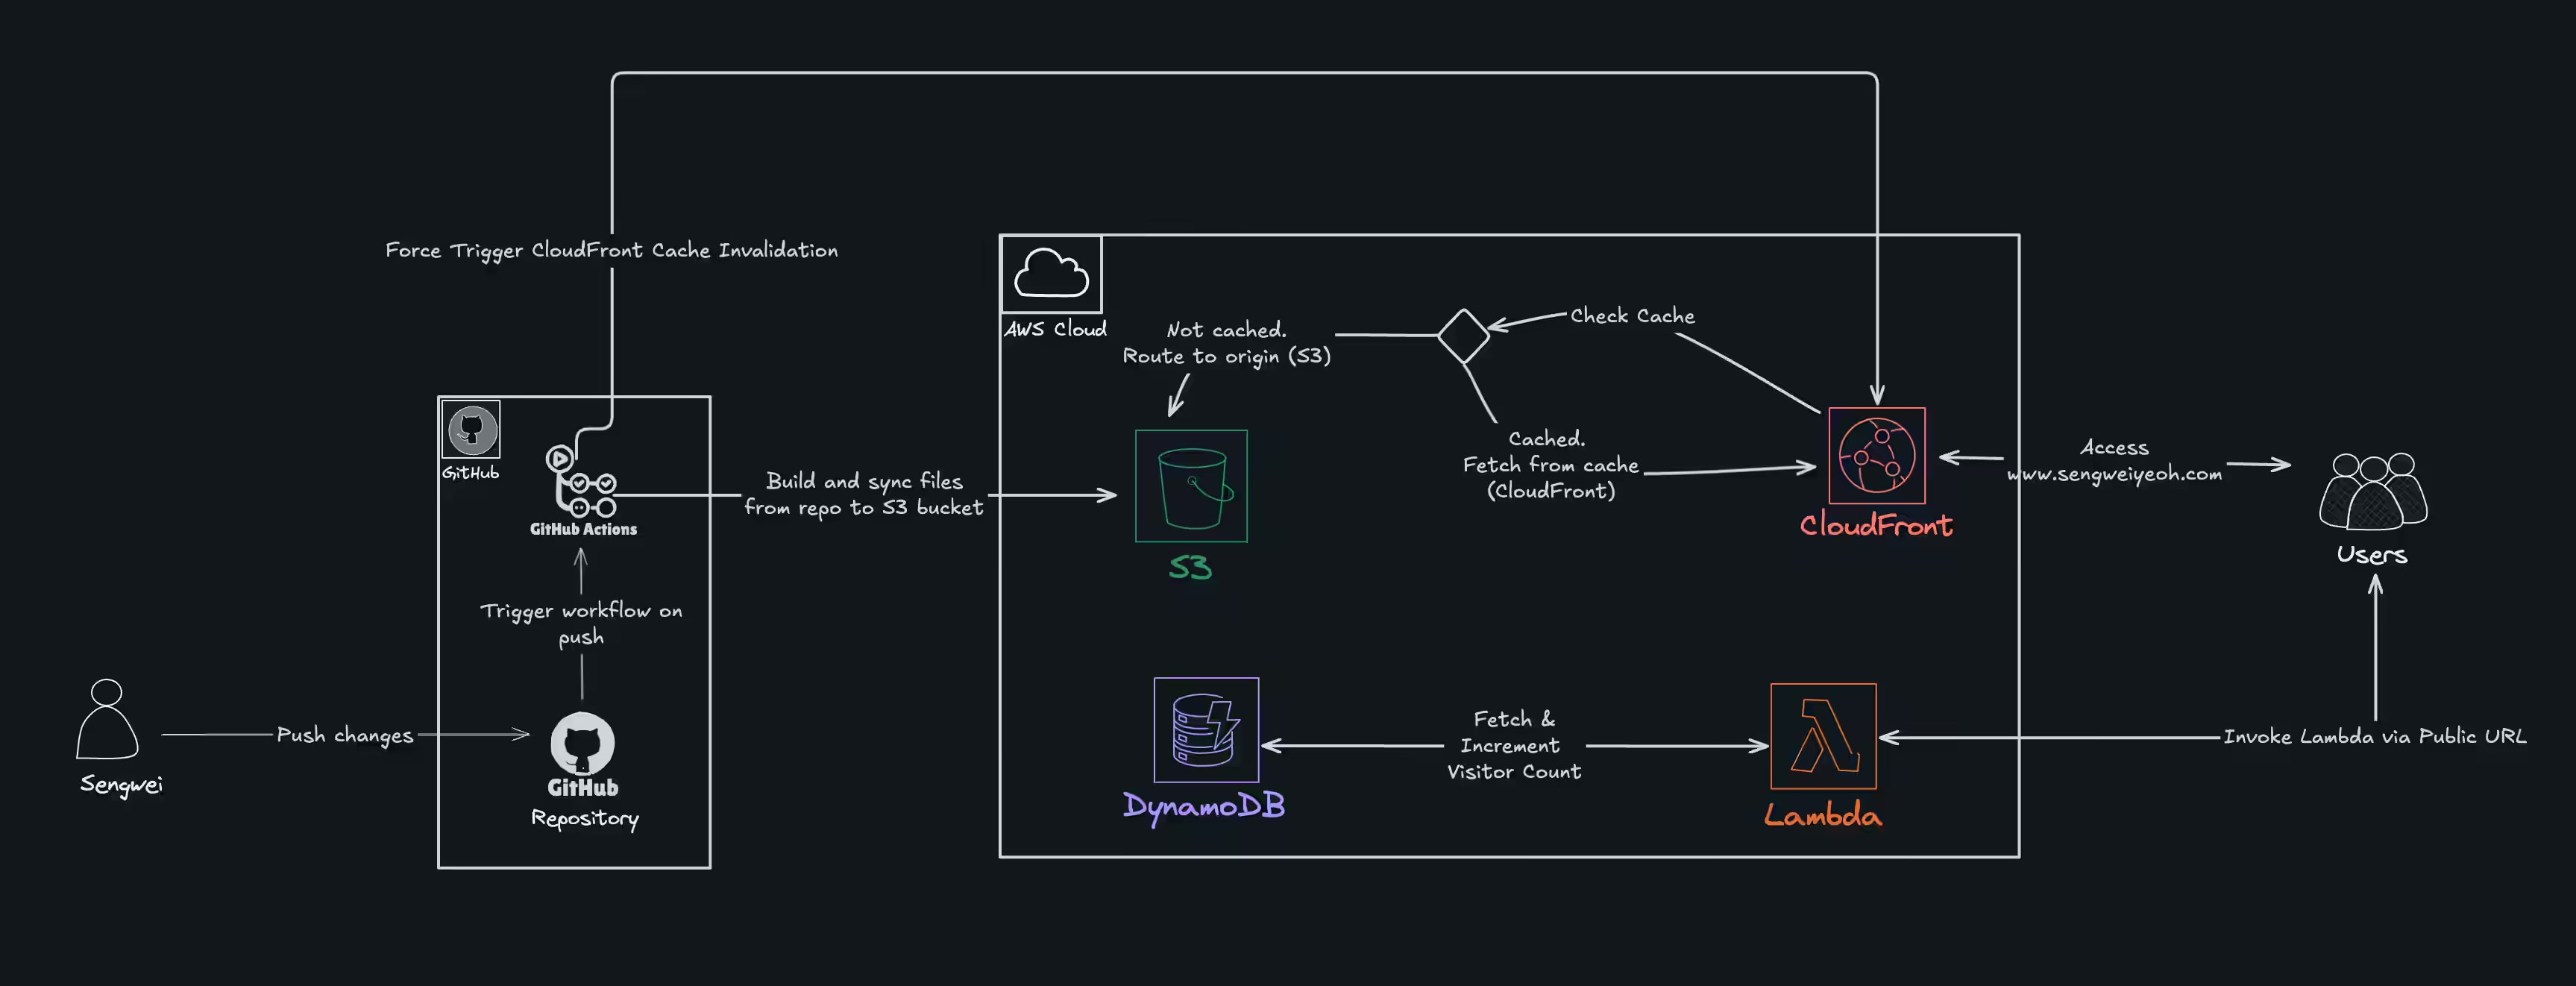
Thanks for reading!